


Wow-ee, it’s been a while. Let me explain.
Since around day 3, I have been dealing with water coming into my van, sealing holes, finding more holes, and ultimately, leaving her at a body shop for 4 days so they could take a stab at it.
After tightening the rear doors and sealing some holes wheel wells and rear top lights, they decided they would order replacement weatherstripping for the rear doors. So while I am waiting the 5 business days for the stripping to arrive, I decided now would be the time to do something substantial on this thang.
It was a gloomy day for a roof van install but it aint gonna install itself, so hopefully the rain would stay fifteen feet back while we knock this out.
We got up semi-early-ish to tackle one of the bigger projects thus far, the roof fan. Starting at around 10:00 & finishing as the clock struck 4:20 (ayee) – we felt very accomplished & learned after this install.
Things feel a little easier after getting this done, like we could actually accomplish some stuff here. Hang in there, TVS – you’re getting the makeover you never dreamed of & that we are imposing entirely on you without your consent. Sorry about the hole in your head, you look great tho girl.
Now, this is just a partial timelapse. This only covered the original cut. We had to take a snack break. Note the drill, alcohol, and vacuum sitting up top. Yes, we drove the van away this way1.
Items used for today’s project:
- MaxxAir MaxxFan 5100K
- butyl tape
- a drill might be nice
- metal blades
- isopropyl alcohol
- metal file
- vacuum
- small primer
- plastic bag/sheet to catch metal filings
The nitty-gritty:
- decide where you are going to install your roof fan and tape a bag or painting tarp below the area to catch any metal shavings 2
- trace 14×14 square at least 8″ from the back, avoiding ribs
- cut pilot holes in corners with drill 3
- apply painters tape on van to minimize scratches
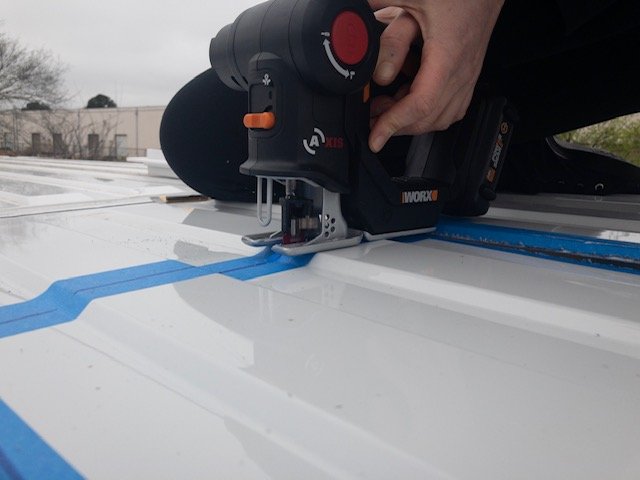
- use jigsaw with metal blade to cut square 4
- fit flange into square 5
- use the metal file to clean up the freshly cut edges
- clean metal with alcohol to and paint edges to rustproof
- place flange into hole to ensure fit, then predrill the 16 holes with a smaller pilot bit
- pull out (obv) and apply butyl tape to both bottom of flange and into gaps of the ribs for a flat surface underneath your fan
- if you got a maxxfan, put aside the flat head screws – those go on the inner flange. we may have fucked that one up and put them on the fan part.
- line bottom of flange with 2-3 perimeters of Dicor for an additional layer of waterproofing
- place the flange into the hole and insert screws evenly, beginning with screws at corners and moving inward
- use dicor self leveling lap sealant around edges and tops of screws 6
- open fan and place into hole with fan opening to rear of van
- get those final 4 screws into the sides of the van. you may have to adjust the four metal tabs to align with the holes in the fan.
- connect to power. we still haven’t figured out how to do this.
some footnotes:
1 remove all items from roof before driving away to the store… bring extra tape/adhesives to fix anything that breaks after falling off the roof when you forget to do so.
2 don’t do what we did – make sure that bag is really secure because if you let that metal scrap square land in it, it just might knock microscopic metal shards all across the inside of your van.
3 you can use the vacuum to clean up excess metal shards. you wanna do this because exposed metal is basically a rust magnet. if you leave filings across your roof or van, you’re gonna have some big issues later.
4 when using smaller drill bits (for example: pilot holes), make sure to place bit snug into drill & move slowly/accurately, so you don’t end up with broken bits’n’pieces. a delicious sounding trail mix but not so delicious when it implies multiple home depot visits on a less-than-ideal forecast’d day. also a solid idea – having spares the first time.
5 cutting slightly larger the first time might be more desirable than cutting slightly smaller. it’s a pain in the ass to file it down gradually – as long as you know you have the lip of the flange to work with. just don’t go too crazy.
6 make sure you know what color your van is & that it aligns with the color sealant that you got. ivory & white are not the same color – oops.

At some point, we should figure out how to install the fan to electricity. wouldn’t it be some shit if the fan didn’t even work.
In the meantime, although I have 95% of the materials we need for the solar system, I am not yet confident in my electrical skills, so I’ve ordered a Goal Zero Yeti 1000 for now. Will probably daisy chain a secondary battery to it for additional capacity.

Pro tip – if you search Goal Zero’s website for “open box” you can get some substantial discounts on returned product. Just know there are no returns or exchanges – all sales are final.